Recently my wife’s Toyota Highlander Hybrid started smelling like something was burning every time we drove the car. Oil was dripping from the engine block right onto the exhaust pipe. This car already has 200k miles on it and the valve cover gaskets started leaking. I couldn’t find any instructions specific to the Toyota or Lexus Hybrids, so I decided to document the repair and share how I did it. A similar process will work for many Toyota and Lexus models with standard or Hybrid 3.3L engines.
Legal Disclosure & Safety
Working on Hybrid vehicles equipped with high voltage battery or working on the car, in general, can be dangerous and potentially fatal. Make sure to learn about and abide by all applicable safety rules. Always wear required safety equipment. For more information consult your owners manual, emergency response guide and dismantling guide for your particular car. All of these resources can be found here for free: techinfo.toyota.com. The following information is provided “as is” and it is not guaranteed to be complete or accurate. Do it at your own risk. See full legal disclosure page here.
Symptoms of Leaking Valve Cover Gasket
- Burning smell or smoke coming from the engine compartment after running the engine for a short period of time.
- Engine oil seeping from the valve cover gaskets and leaking down the engine block.
- Engine compartment covered with oil when looking at it from under the car.
- Oil level on the dip stick may start decreasing over time if the leak is significant.
- Engine oil stains on the garage floor or on the driveway.
- If oil seals are leaking, 0il can get inside the spark plug tubes.
- Oil inside the spark plug tubes may cause a cylinder misfire.
- Check engine indicator light may come up on the dashboard.
- Diagnostic scanner may detect trouble error codes P0300 – P0310.
Required Tools
- Wrench and sockets set (particularly 10, 12, 14 mm)
- Sockets extension set (particularly 3 and 6 inches)
- Torx star socket set (particularly E6 and E8)
- 8-mm Allen hex bit
- Ratcheting wrench set (particularly 12 and 14 mm)
- Phillips and flat-head screwdrivers
- Fasteners and trim removal tool
- Torque wrench
- Pliers
- Gasket scraper
- Paint thinner, acetone or brake cleaner
- Drain pan
- High voltage safety rubber gloves
Required Replacement Parts
I always try to get original OEM parts when possible for the best quality and fitment compared to aftermarket parts. I prefer to order parts online to save money, and because of that, it is important to order everything at the same time. Otherwise, if you forget something, it may take several days to get it delivered. Here is the list of parts that I used. For your convenience, I also included the links to the sites where I bought them from.
- Front valve cover gasket
- Rear valve cover gasket
- Six spark plug tube oil seals
- Upper intake manifold plenum gasket
- Throttle body mounting gasket
- RTV silicone gasket maker
Recommended replacement parts
Getting to some of the components is not a particularly easy task on this V6 engine. For that reason, I am also replacing many other parts during this repair since I have easy access to them now.
- Spark plugs
- PCV valve
- PCV valve hose (mine was cracked)
- New radiator coolant (if you are due for the coolant flush)
- Ignition coils (if necessary)
*These are Amazon and eBay affiliate links. Always check compatibility when buying parts from these sites to ensure the best fitment and timely delivery.
Disconnecting the 12V and Hybrid Batteries
- Make sure the car is turned off and the key is removed from the ignition cylinder.
- Use proper protective rubber gloves and disconnect the negative terminal of the 12V battery. Isolate the cable end to prevent it from accidentally touching the negative battery post.
- It is very important to disconnect the high voltage battery for the electric engine! It carries high voltage capable of causing serious or fatal injuries.
- WARNING: The high voltage system may remain powered for up to 10 minutes after the vehicle is shut off or disabled. To prevent serious injury or death from severe burns or electric shock, avoid touching, cutting, or opening any orange high voltage power cables or high voltage components.
- Wear protective clothing such as electrically insulated rubber gloves, safety goggles, safety shoes. Make sure that protective gloves are not wet, cracked, torn, or damaged in any way.
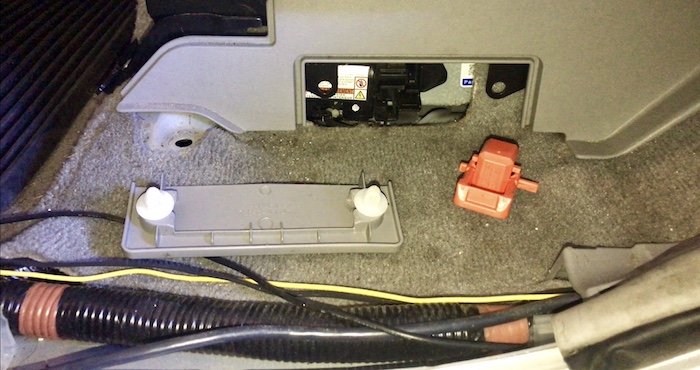
- Remove the service/emergency shut-off plug from the high voltage battery. On Highlander Hybrid it is located under the back row seat on the driver’s side. Pull up and remove the plastic scuff plate on the floor held in place by 5 clips. Remove the service plug cover. Lift the service plug handle and pull out the service plug. Use insulating tape to cover the exposed service plug socket.
Drain Engine Oil and Radiator Coolant
You may or may not have to do this step depending on how your particular car has its engine oriented in the engine bay. On our Highlander Hybrid the engine is mounted at the angle, therefore replacing valve cover gaskets requires draining engine oil. For that reason, you may plan this repair around your next oil change. You also have to drain the radiator coolant because later we will be disconnecting several coolant hoses to remove some of the parts. If you are due for the coolant flush, now is a good time to do that too.
Front Valve Cover Removal
- Remove engine cover(s) if present. On my Highlander HV, there is only one cover. I was able to pop it right off – without any screws or fasteners securing it. Yours might be different.
- Before you start removing all other parts, blow off dust, sand, and debris from the engine compartment to keeps it as clean as possible. You can use an air compressor or leaf blower to do that.
- Release four tabs securing the air filter cover and remove a 10-mm bolt and a push pin fastener on the front side of the air duct. Remove the air duct and the air filter cover.
- Next, remove three 10-mm bolts and take out the air filter housing.
- Remove air intake assembly and resonator. Cover all openings to prevent dust and debris from getting inside.
- Detach the orange high voltage cable and move it out of the way. Remove the high voltage cable bracket (red) using a 12-mm socket.
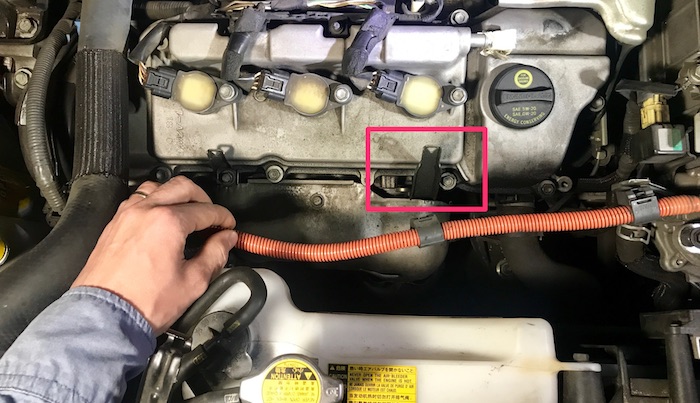
- Detach the orange cable from the bracket near the negative terminal of the battery. This will give you more flexibility when removing the front valve cover.
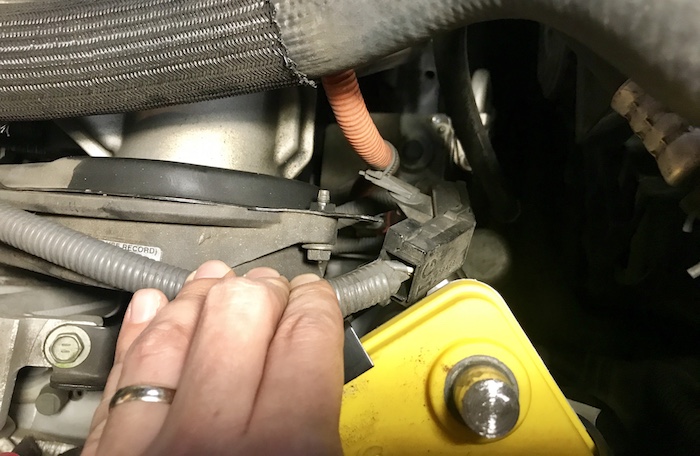
- Detach the blue wire harness clamp from the timing belt cover bracket.
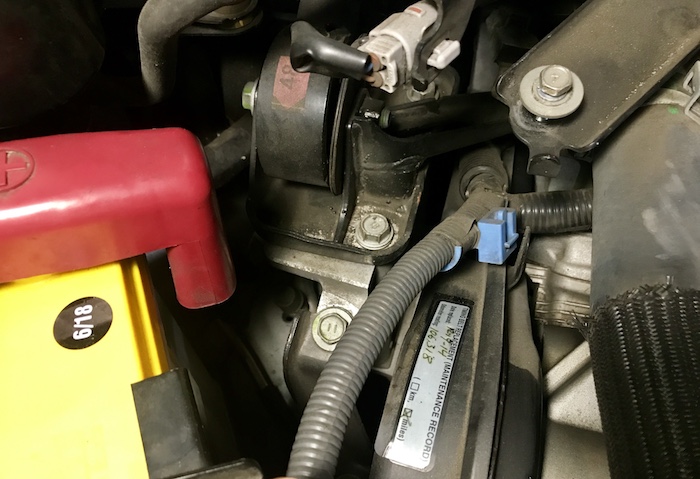
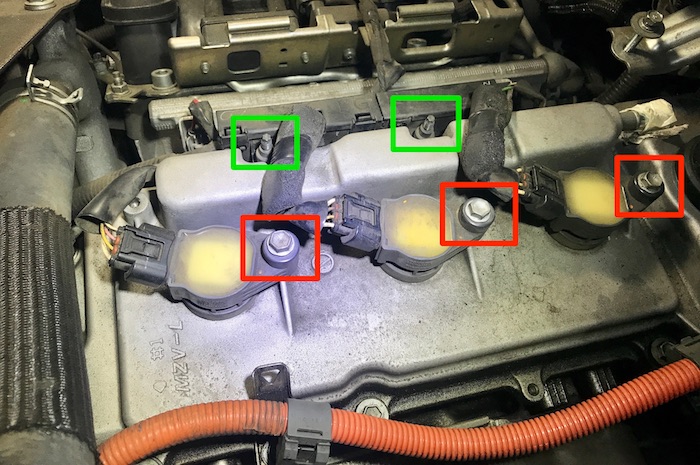
- Use E6 Torx star socket to remove two (green) bolts securing the wiring harness protector. Remove three 10-mm ignition coil bolts (red). I tried to disconnect the ignition coil electrical connector, but the plastic release tab was very brittle and it broke off right away. It is a very common issue on many older cars. Instead, later I was able to remove all other ignition coils without disconnecting them.
- Unplug three fuel injector electrical connectors (blue). Unplug vacuum valve switch connector (green). Detach the connector wire from the bracket by depressing plastic release tabs on the bottom (red).

- Remove ignition coils from spark plug tubes without disconnecting them. Move the wiring harness and ignition coils away from the front valve cover. Remove nine 10-mm valve cover retaining bolts with washers (red).
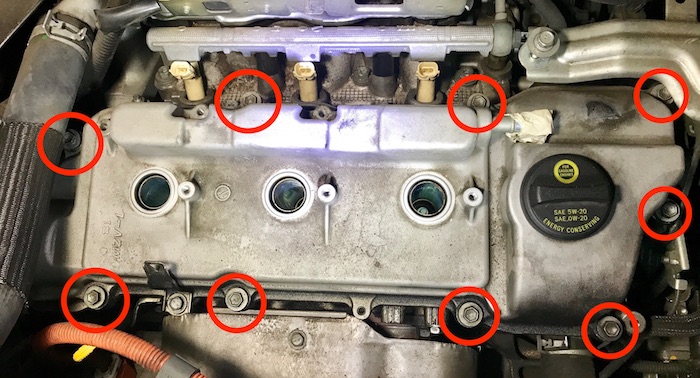
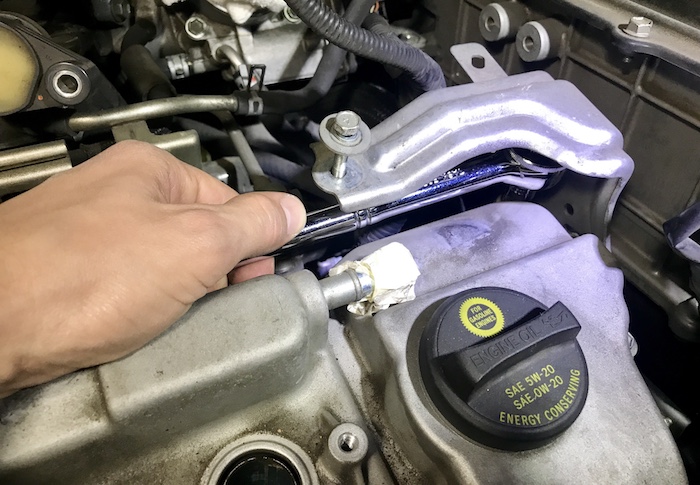
You should be able to access the bolt in the upper right corner using a wrench and a short 10-mm socket. It will be much easier than trying to remove the bracket.
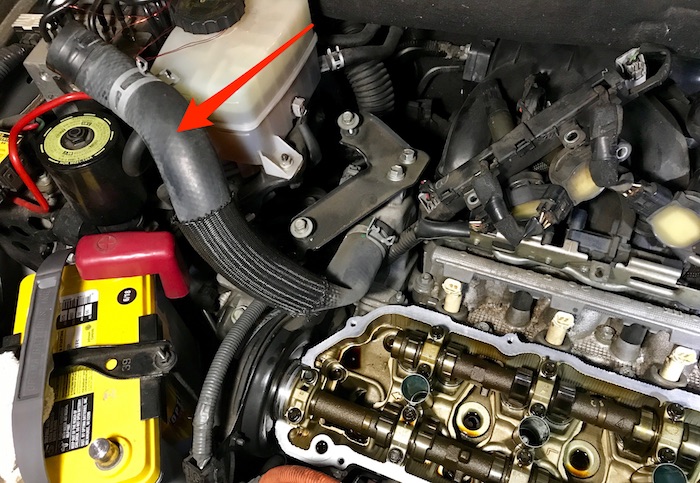
- If necessary, disconnect and move the radiator hose out of the way. I disconnected one side of the hose and tied it to the brake fluid reservoir using a wire. Now you should be able to remove the front engine valve cover.
Valve Cover Gasket Installation.
There is no particular order in which you need to replace the valve cover gaskets. I started with the front one because it is easier to access and I finished replacing it before starting the one in the back. This way I did not have to worry about dirt or debris getting inside the open engine block. The following installation process will be similar for both the front and rear valve cover gaskets.
- Thoroughly clean mating surfaces of the cylinder head and the valve cover using gasket scraper, brake cleaner, paint thinner or acetone. Remove all traces of old gasket, silicone sealer, debris, oil or residue. Failing to do so may result in repeat oil leaks.
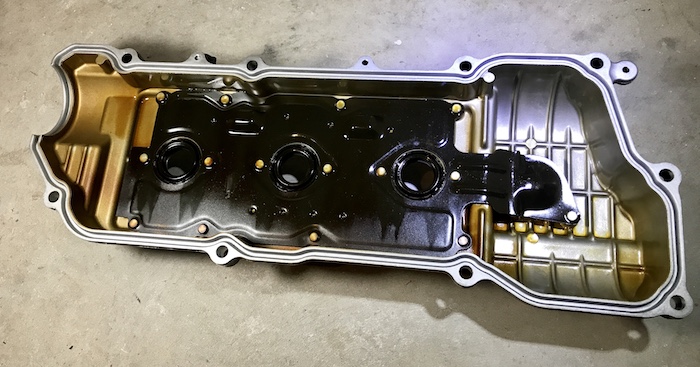
- Replace spark plug tube oil seals. Bend the retaining tabs using a flat-head screwdriver or long-nose pliers.
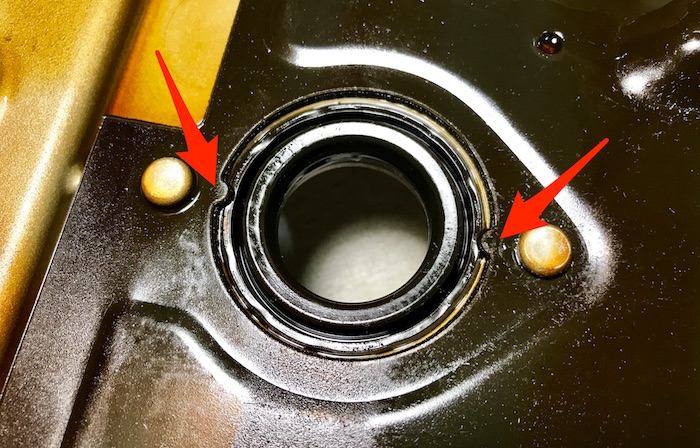
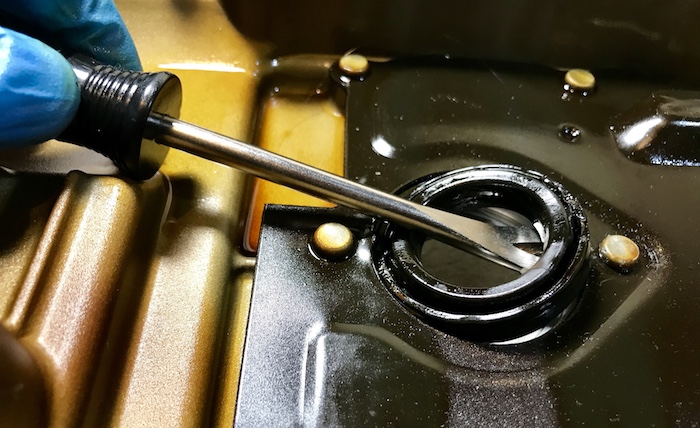
Remove spark plug tube oil seals using a flat-head screwdriver or trim removal tool. Install brand new oil seals. Use a small amount of oil around the seals if they don’t fit in easily. Bend the retaining tabs back to their original position.
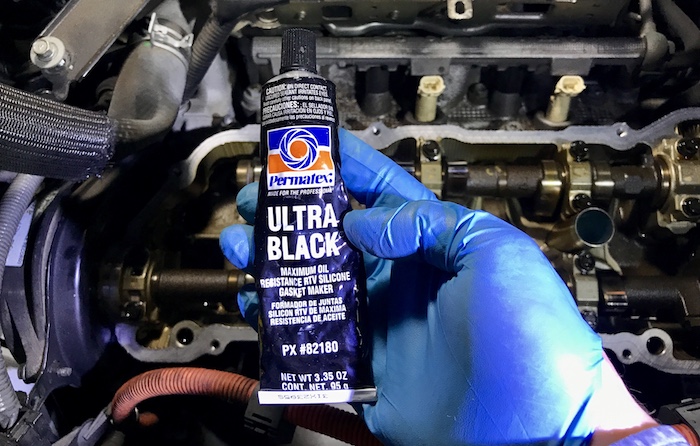
- Use appropriate silicone gasket sealant in the spots described below. Various brands or types of gasket makers may have different installation instructions. Follow installation instructions provided on the packaging. I am using Permatex Ultra Black RTV gasket maker that is rated for maximum oil resistance and high temperatures.
- Remove a half-circle shaped metal piece on the right side of the engine block. Thoroughly clean off all old gasket sealer. Apply a continuous and even bead of silicone gasket maker to one side of the contact surface and then reinstall the metal piece.
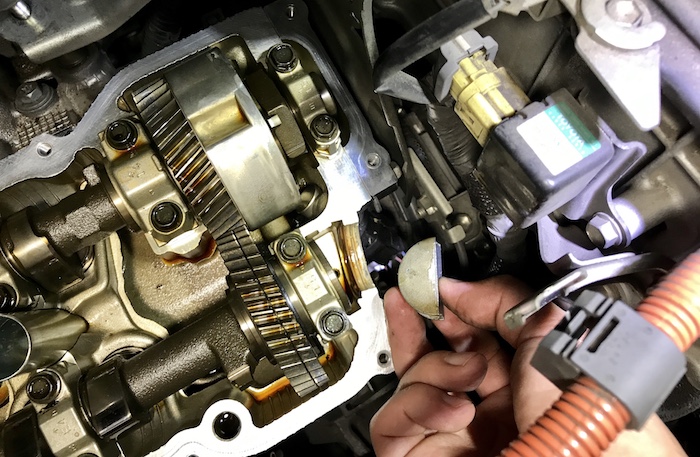
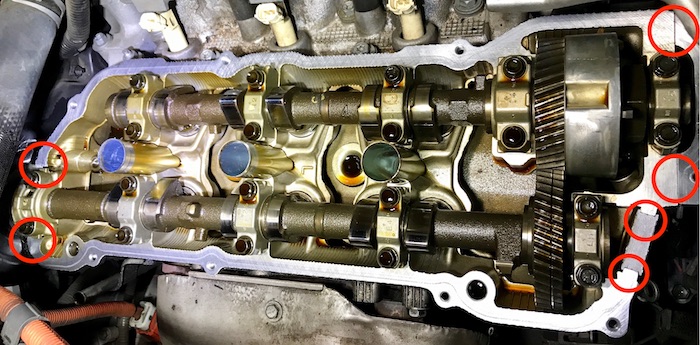
- Apply new gasket maker to the joints indicated below according to the installation instructions for the particular gasket maker brand you are using. Install the valve cover with a new gasket. Allow the silicone to dry and fully cure before starting the engine.
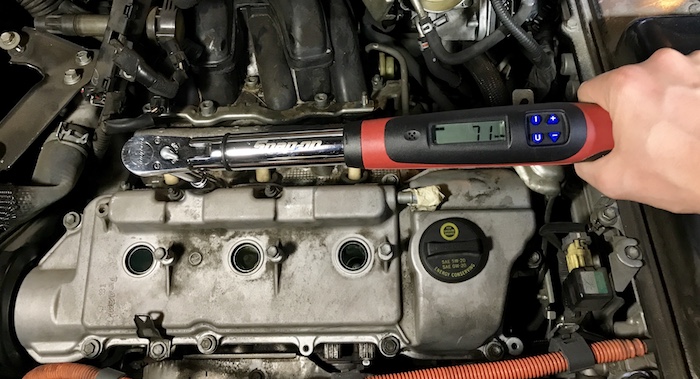
- Use a torque wrench to gradually and equally tighten the valve cover retaining bolts to the factory torque specifications. For my particular engine 3MZ-FE, it is 71 in-lbs (8 Nm). If your car has a different engine, consult your repair manual for correct torque values. Tighten the bolts a little at a time. Do not overtighten the bolts to avoid damaging the softer metal of the engine block. I am using a digital torque wrench, but regular click type torque wrench should work just fine.
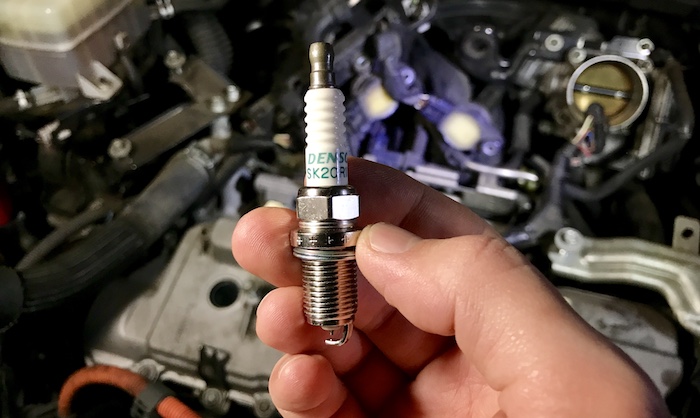
- While you have easy access, check and if necessary replace spark plugs. Mine were approaching the end of their service life, so I replaced them with original factory OEM Denso spark plugs that should last for the next 120,000 miles!
- Check and if necessary replace ignition coils.
- Reinstall the remaining parts in the reverse order of installation.
- Tighten two E6 Torx wiring harness protector bolts to 74 inch-lbs (8.4 Nm).
- Tighten ignition coils retaining bolts to 71 inch-lbs (8 Nm).
Rear Valve Cover Removal.
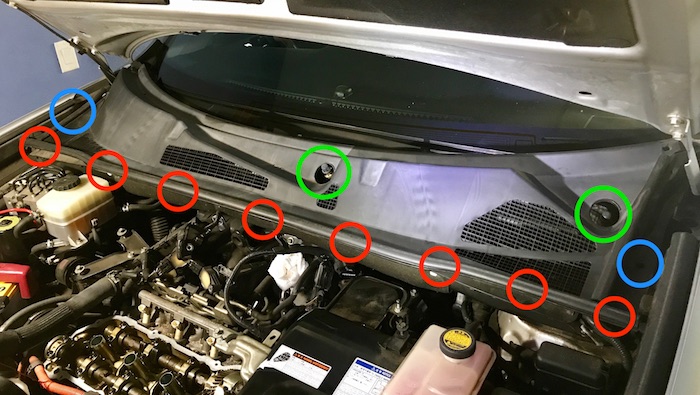
- Remove both 14-mm wiper arms nuts (green). Mark the position of the wiper arms in relation to their shafts and then remove them. Remove two push pin fasteners (blue) and disengage 8 retaining clips (red) and then take out the plastic cowl cover. This step may be a little different but still pretty similar if you have a different Lexus or Toyota model.
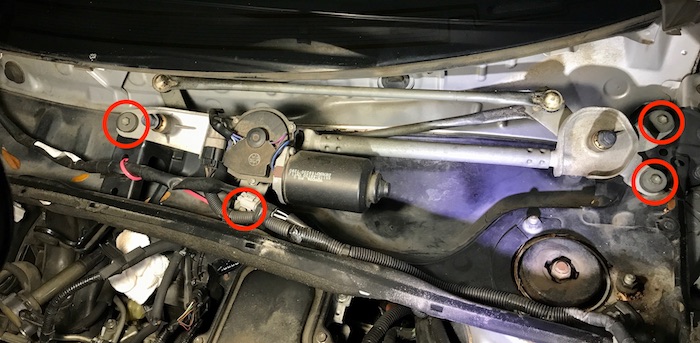
- Depress the release tabs and disconnect the wiper motor and windshield defroster electrical connectors.

- Remove windshield wipers motor assembly held in place by four 10-mm bolts (red).
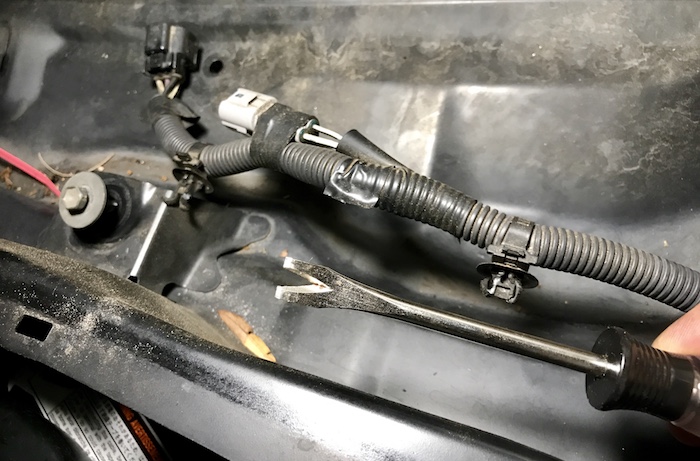
- Use a trim removal tool to detach wires from the cowl cover.
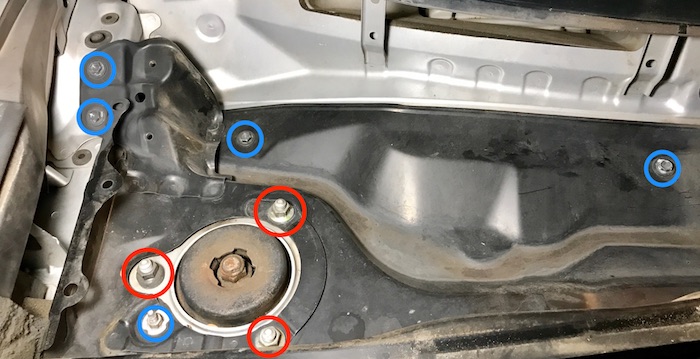
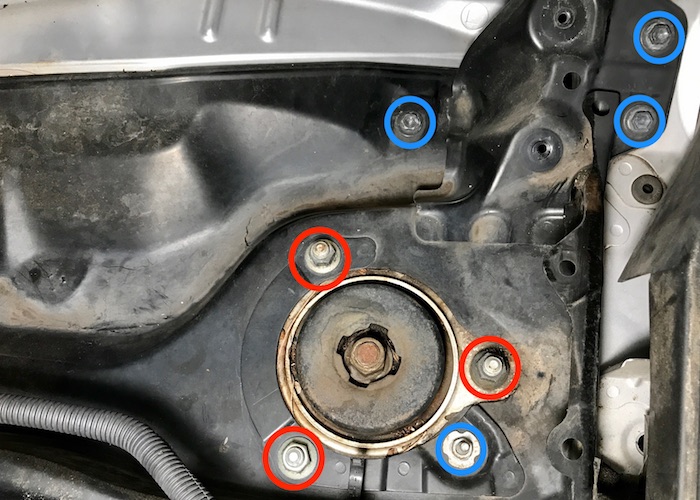
- Remove six 14-mm (red) and nine 10-mm (blue) bolts and then take out the cowl cover.
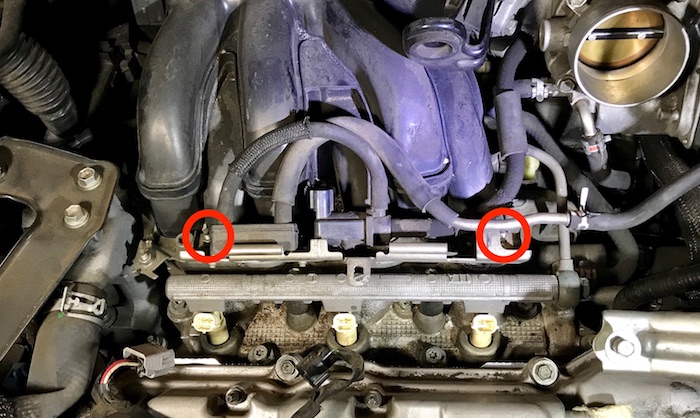
- Remove two 10-mm nuts (red), detach the vacuum switching assembly and set it aside.
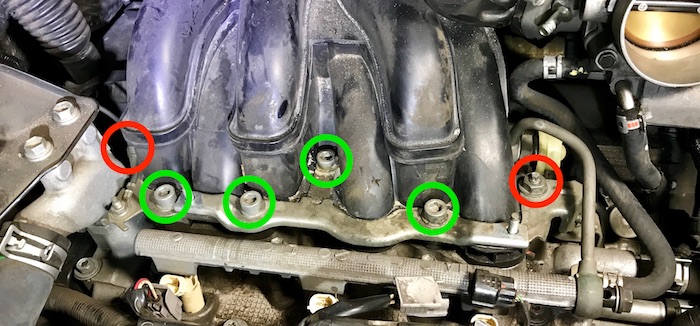
- Next, remove four 8-mm Allen hex bolts (green) and two 14-mm (red) nuts and set aside the intake manifold bracket.
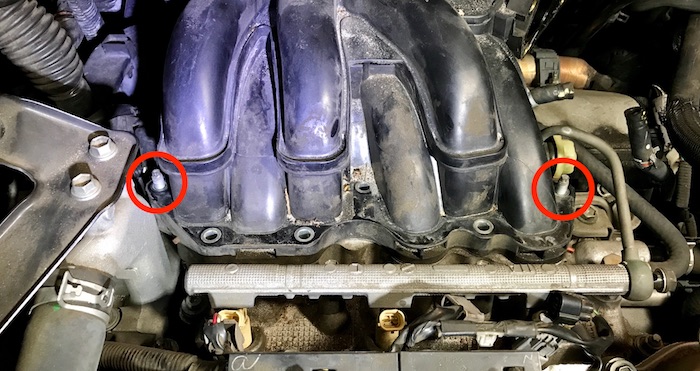
- Remove two mounting studs from the cylinder head using E8 Torx star socket.
- Depress the release tab and disconnect the electrical connector from the throttle positioning sensor.
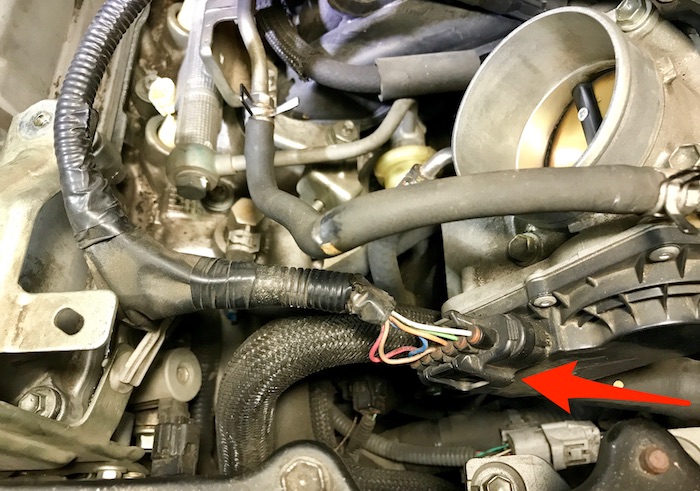
- Mark or photograph all hoses before disconnecting them. This will make your life much easier when it’s time to reconnect them. Remove metal clamps and disconnect a vacuum hose (blue) and two coolant hoses (red) from the throttle body. Some coolant may spill when you disconnect these hoses. Use a rag to catch and wipe spilled coolant fluid.
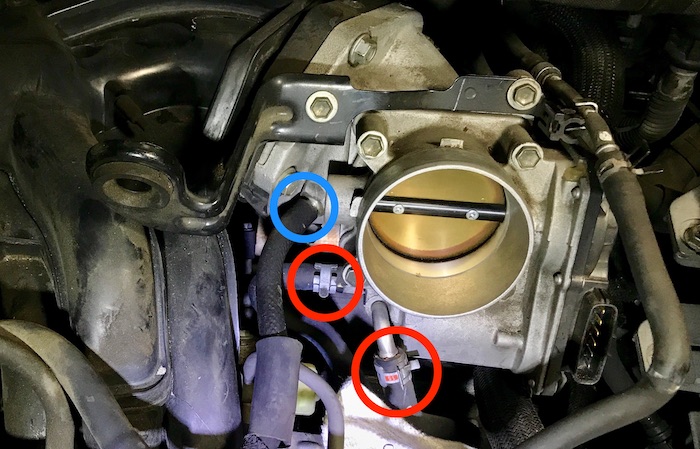
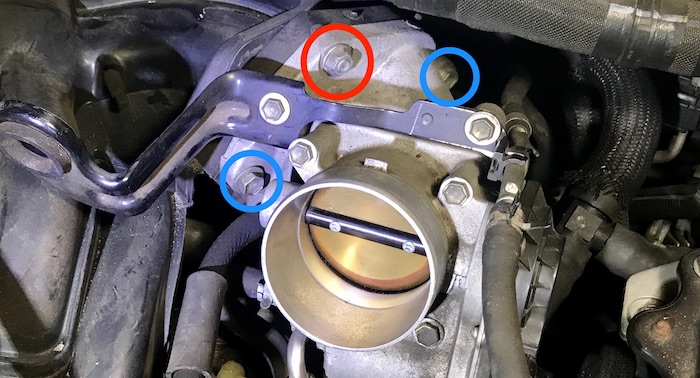
- Remove one 12-mm nut (red) and five 12-mm bolts (blue) holding the throttle body. *Some of the bolts in the back are not visible on this picture. Remove the throttle body assembly.
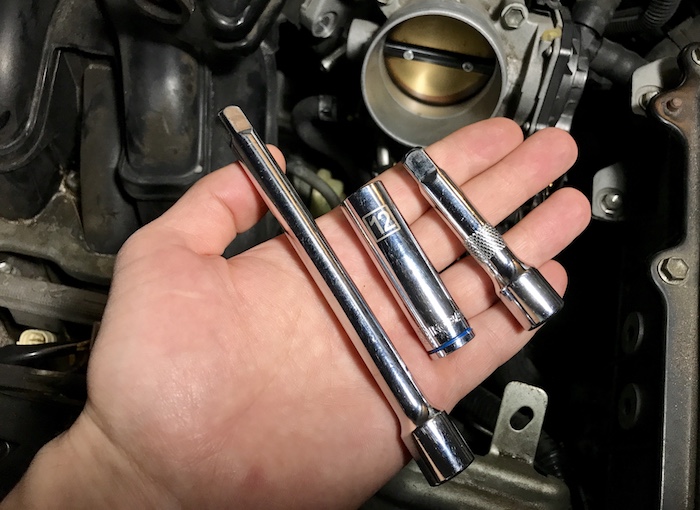
- I used 3 and 6-inch extensions to remove the throttle body bolts and nut.
- Make sure to install brand new mounting gasket when reinstalling the throttle body.
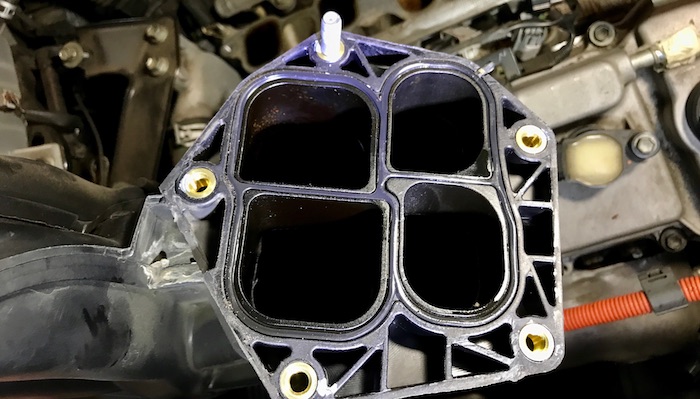
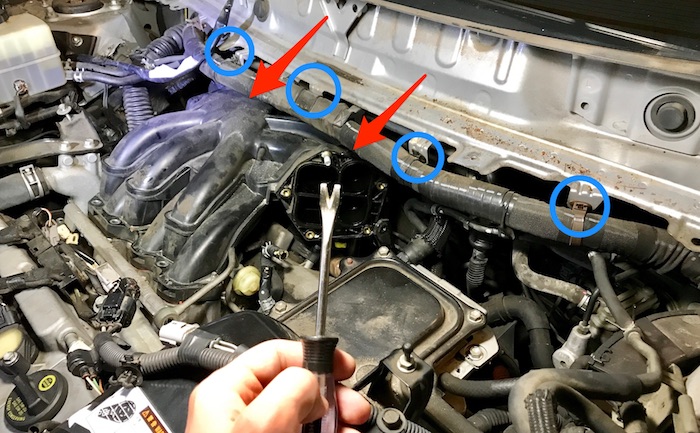
- Use trim removal tool to detach four wire harness clips (blue). Remove two bracket bolts in the back of the intake manifold. It is hard to take a picture of them. Two red arrows show the general location of these bolts. They are 14-mm on the left and 12-mm on the right. I used ratcheting wrenches to remove these two bolts.
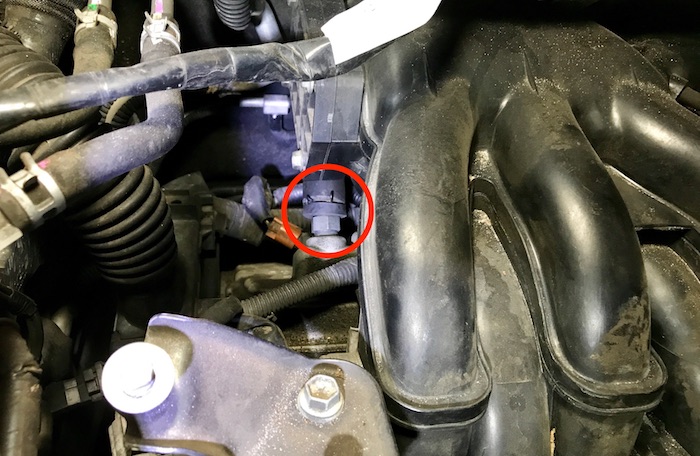
- Disconnect PCV valve hose behind the upper intake manifold on the left side.
- Remove the upper intake manifold. Make sure to use a brand new gasket when reinstalling the upper intake manifold.
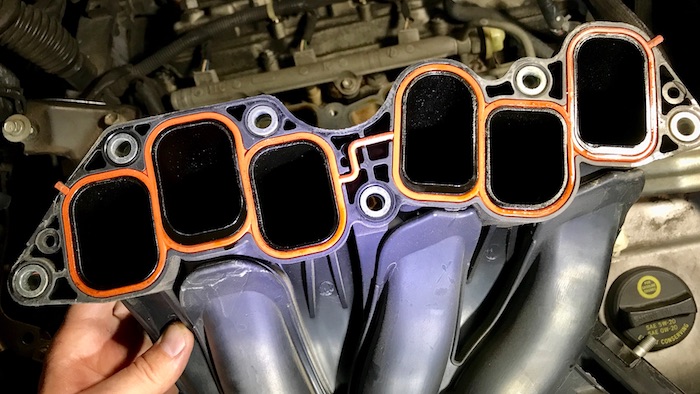
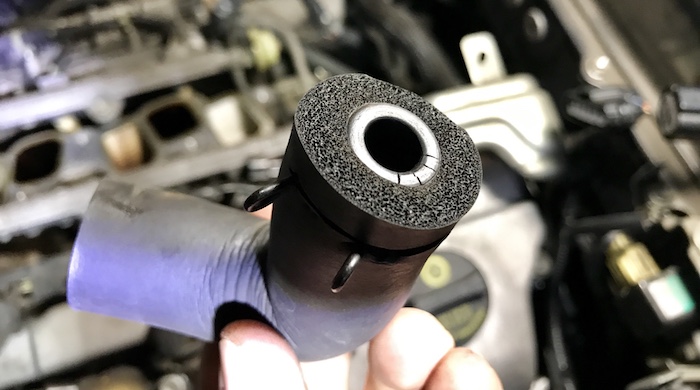
- Inspect for cracks or damage and if necessary replace the PCV valve hose. Also, replace the PCV valve since it is easily accessible now.
- Disconnect three fuel injector electrical connectors (green) and detach the wire clips (orange) from the rear valve cover. Unplug O2 Oxygen sensor connector (yellow). Remove three 10-mm nuts (red) holding cable clamps. Remove three 10-mm ignition coil mounting bolts (blue). You can now take out all three ignition coils without disconnecting them, to avoid breaking old plastic release tabs.

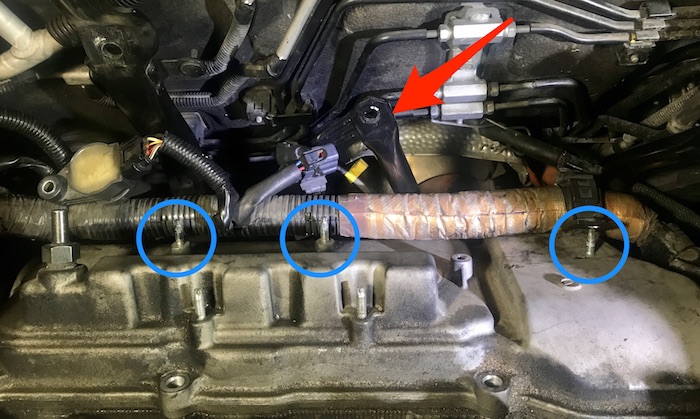
- Lightly loosen 12-mm bolt and and and move the mounting bracket (red arrow) to the side to be able to access one of the valve cover bolts. If necessary, you can also remove three mounting studs (blue) from the valve cover for more flexibility.
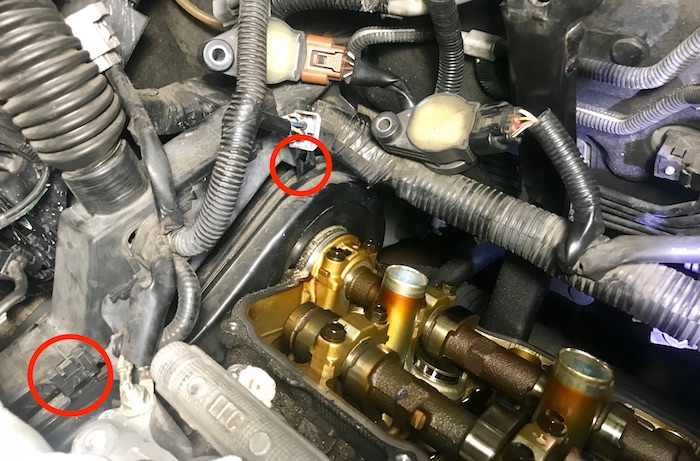
- Unclip wiring harness from the timing belt cover. This will also give you more flexibility when tring to remove the valve cover.
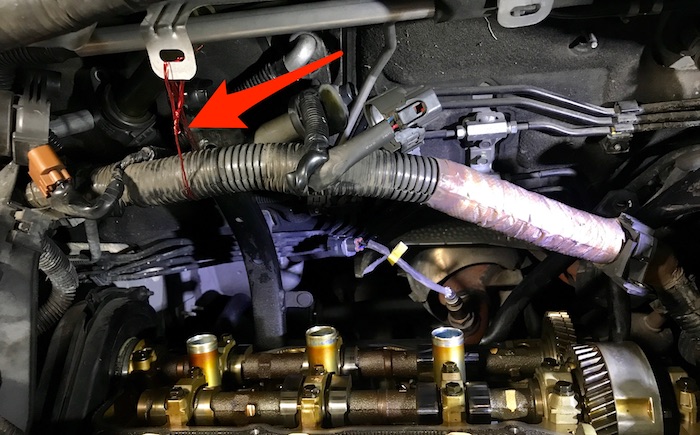
- I also suspended the cables using a copper wire. It was very helpful when trying to take the valve cover in and out.
- Install the rear valve cover gasket the same way we did it on the front side.
- Reinstall the remaining parts in the reverse order of installation.
- I also recommend cleaning the oil that was dripping down the side of the rear engine block and onto the exhaust pipe. Otherwise, you may still have a smoke or burning smell coming from the engine compartment for some time after replacing the valve cover gaskets. I used brake parts cleaner to clean all that oil.
- Tighten ignition coils retaining bolts to 71 inch-lbs (8 Nm).
- Add the proper amount of engine oil and coolant.
- Start the engine and check for oil and coolant leaks.
Do you still have questions?
Error Codes
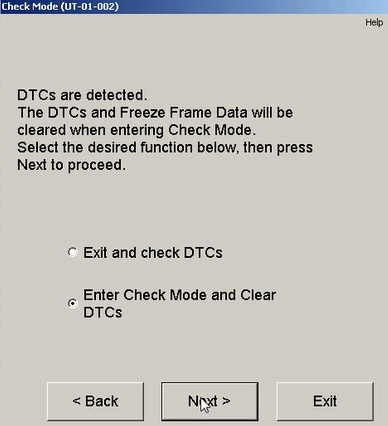
When I started the car for the first time after this repair, I immediately got “Check Engine” and “Check Hybrid System” warning lights on the dashboard. I scanned the car and got the error codes P0A0F (Engine Failed to Start) and P2111 (Throttle Actuator Control System – Stuck Open).
You may need to use advanced diagnostic scanner tools to be able to read engine, Hybrid, ABS, or transmission system related error codes. I used my TechStream diagnostic cable that works with any Toyota, Lexus or Scion car. Connect your laptop to the OBD2 port on your car and launch the software. Click on Connect to Vehicle/Health Check/Hybrid Control/Utility/Check Mode. I ran the Check Mode and cleared all error codes, and they never came back since then.
Compatibility
This valve cover gasket replacement procedure will work on the following Toyota & Lexus models equipped with 3.3L V6 (engine code 3MZ-FE).
- 2004-2007 Highlander
- 2004-2008 Toyota Solara V6
- 2004-2006 Toyota Sienna
- 2005-2006 Toyota Camry SE V6
- 2005-2010 Toyota Highlander Hybrid
- 2004-2006 Lexus RX 330
- 2005-2009 Lexus RX 400h
- 2004-2006 Lexus ES 330
A similar process may also apply to many other models with 3.5L V6 engine codes 1MZ-FE, 2GR-FE, 2GR-FSE, 2GR-FKS, 7GR-FKS, and 8GR-FXS. Toyota: Tacoma, Avalon, Aurion, Rav4, Vanguard, Land Cruiser Prado, Harrier, Estima, Previa, Targo, Crown, Camry, Highlander, Kluger, Blade, Mark X Zio, Alphard, Vellfire, Venza, Sienna, Corolla GT. Lexus: ES 350, RX 350, RC 350, GS 350, IS 300 AWD, IS 350, IS 350 C, GS 450h, LC 500h, LS 500h. Lotus: Evora, Evora GTE.
