Memory clean-up on Mac computers.
After using your Mac computer for some time you may realize all of a sudden that it is running low on storage memory.
There might be multiple reasons for this and it is not necessarily related to storing large amounts of files on your device.
There are quite a few programs and services running on your Mac that may be eating up the valuable storage space that you may never even knew about. In this article, we will go over the most common and effective ways to claim back those precious megabytes, gigabytes, or even terabytes. The methods presented here will work alike on multiple generations and models of Apple products, such as iMac, Mac Pro, MacBook Pro, MacBook Air, and Mac Mini.
Tracking Your Progress
Mac OS has a great built-in program called Disk Utility. It allows you to review and manage your storage devices. To open up the program, go to Spotlight Search and look for “Disk Utility”. There you will find a list of all internal hard drives and external storage devices currently connected to your computer. Click on your primary internal hard drive on the left pane to review disk information. Here you will find your hard drive total capacity, as well as free, used and purgeable space.
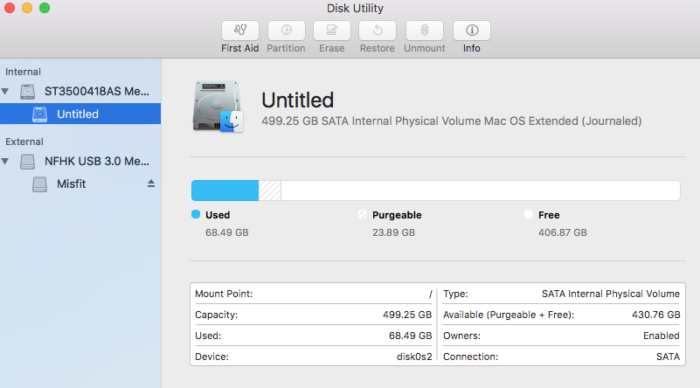
We are going to use this utility to track progress. Note that Disk Utility doesn’t refresh automatically when you delete something from your device. You will have to close and reopen it after performing each step described in this article to see how much space was recovered after each step.
Step 1. Delete old unneeded iOS backups.
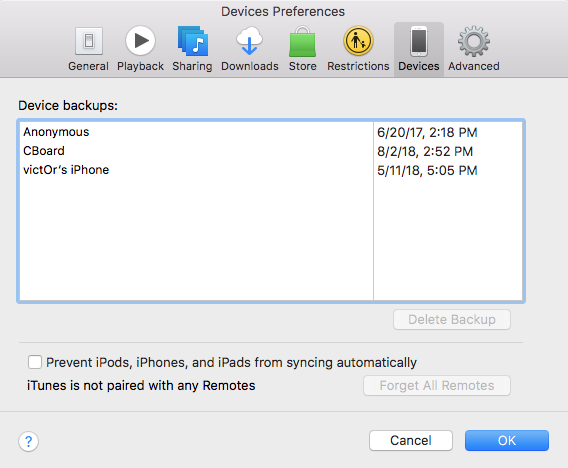
If you ever connected your iOS devices such as iPhone, iPad, or iPod to your Mac computer, chances are the entire content of your iOS device was automatically backed up to your computer. If you had a lot of pictures, videos, and documents on your gadgets, those backups will take up a lot of space on the hard drive of your Mac. While it is always a good idea to back up your valuable information, some of those backups could be for the devices you no longer even have anymore. If that’s the case, deleting those old unnecessary backups may help to recover a significant amount of memory real estate.
To delete old iOS backups, simply:
- open up the iTunes program
- click on “iTunes” tab at the top
- select “Preferences” option
- click on “Devices” tab
- examine the list of device backups
- delete old and unneeded backups
- keep only the latest backups for the devices you are still using
Step 2. Delete programs that are no longer needed
This is especially true if you have been using your computer for several years now. Over time many of us tend to install many programs. Some of them were probably used only once, others are simply no longer needed. You may also have a number of toolbars and browser extension that were installed often without your knowledge. Those toolbars and extensions usually don’t take up much space, however, they may negatively affect the performance of your Mac.
To delete unwanted programs, open “Finder”, click on “Applications” folder on the left side pane. You will be presented with a list of all programs currently installed on our machine. Go over the list and see if you can spot anything that doesn’t belong there anymore. If the amount of free space is so critically low that you cannot effectively use your computer any move, you can temporarily delete a few programs you can live without, just to get you through the day. You can reinstall them later after you get a chance and time to sort out all memory issues.
To delete a program, right-click on its name and select “Move to Trash” option. The program will then be moved to trash, but it won’t be completely removed from your computer just yet. You still need to empty trash: right-click on “Trash” icon and select “Empty Trash” option. Only then the physical storage space on your hard drive is truly purged.
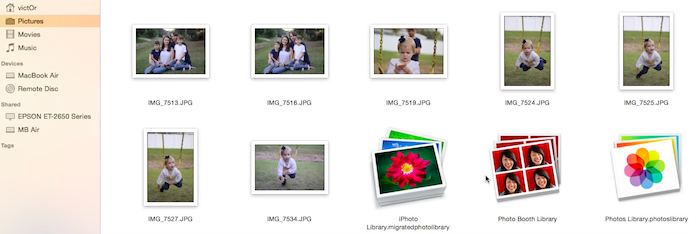
Step 3. Delete iCloud photo libraries
When you have iCloud photo sharing enabled on your Mac computer, all of the photos and videos on your iPhone will be automatically uploaded to your computer. With the latest advancements in iPhone and iPad cameras, photos and videos can quickly use up a significant amount of space both on your mobile devices and on your computer. If you don’t want to access your photos on your Mac, you can simply turn off iCloud photo sharing in System Preferences. Otherwise, you may want to move older files to external hard drive to free up some storage space.
To delete existing iCloud photo libraries, go to Finder/Pictures, and then move to trash the following folders: “iPhoto Library.migratedphotolibrary” and “Photos Library.photoslibrary”. If necessary, make sure to back up your files inside of each folder before you delete them.
Don’t forget to empty the trash to permanently delete unwanted files from your computer. Depending on how many files you had, this may take anywhere from a few minuted to a few hours.